If you are using Digital Ocean server, then here is step by step guide for taking automated snapshot of your Digital Ocean Droplet. If you are spending time on taking manual snapshot at regular interval, then this post is going to reduce that strain.
Things you are going Achieve After Reading this Post:
- Automate taking Digital Ocean Droplet snapshot
- You will learn How to Configure-how often and what time you need to take snapshot of your droplet
- Specify how many droplet snapshot to keep on your Digital Ocean account
- Automatically delete older snapshot from your digital ocean account
- Once the snapshot process done it automatically Power On the Server
Requirements:
- 2 Digital Ocean droplet:- One droplet is to run snapshot automation script 24*7 and another droplet is the digital ocean server which you need to take snapshot automatically.
- Dosnapshot Script:- This is the script which we are going to use to take digital ocean snapshot automatically.
- Digital Ocean Access API Tokens or Personal Access Tokens
Step by Step Instruction on setting up of DoSnapshot Script to automate Snapshot Process:
I hope by this time you already have 2 test digital ocean droplet. Now we need to get digital ocean “Personal Access Tokens”.
Get Digital Ocean Personal Access Tokens:
- Go to Digital Ocean Application Settings page by navigating API >> Your Tokens >> and click on Generate New Token button

- In the next step give some name for the access token. In this guide I’m going to keep “For backup script” and click on “Generate Token” button

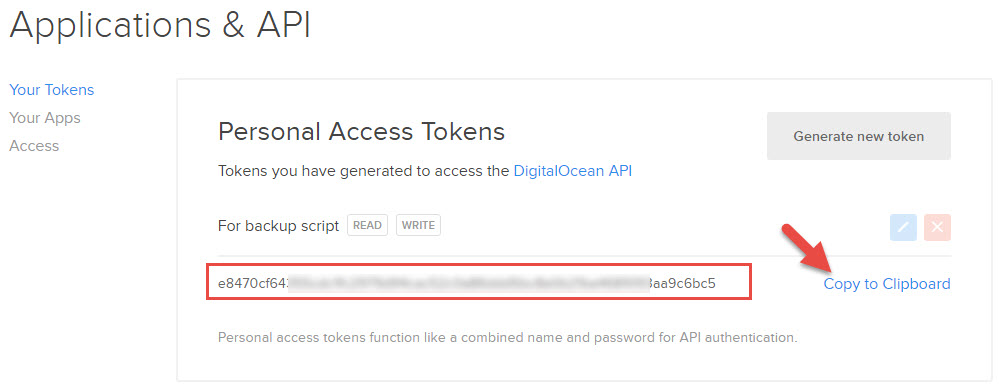
- In the Next Step you are going to get Personal Access Tokens to your Digital Ocean account. Copy and Keep it on somewhere safely, because you are not going to see that again.


So now we have Digital Ocean Access Tokens with us.
Install DOSnapshot and Configure on Server:
Before we start it, Lets understand what the server name points to which server. In the below image you will see 2 servers. One is Server-to-Backup and another is Automation-Script-Server.
Server-to-Backup: This is the server to take automated snapshot on scheduled timing.
Automation-Script-Server: This is the Server to which runs digital ocean automated snapshot script (DoSnapshot).

In this tutorial mostly we will deal with installing and setting up of DoSnapshot script, so open 2nd server i.e., Automation-Script-Server on SSH.
Dosnapshot requires Ruby on Rails to run that script. So now we are going to install Ruby on Rails on our Ubuntu Operating system (Ubuntu 14.04.3 x64).
Installing Ruby on Rails on Ubuntu 14.04:
- Run the below command on SSH
gpg --keyserver hkp://keys.gnupg.net --recv-keys 409B6B1796C275462A1703113804BB82D39DC0E3 \curl -sSL https://get.rvm.io | bash -s stable --rails
ds
2. After executing the above command, it automatically adds below command as well. Just click Enter again
\curl -sSL https://get.rvm.io | bash -s stable --rails
3. After completion of that command execution have a look on last few lines. You will see some message saying
To start using RVM you need to run `source /usr/local/rvm/scripts/rvm`
in all your open shell windows, in rare cases you need to reopen all shell windows.

so copy the above command and execute it as well.
source /usr/local/rvm/scripts/rvm
4. Run the below command to download dosnapshot script
wget https://assets.merqlove.ru.s3.amazonaws.com/do_snapshot/do_snapshot.tgz --no-check-certificate
5. Now execute below commands one by one
tar -xzf do_snapshot.tgz
cp -r do_snapshot /usr/local/
ln -s /usr/local/do_snapshot/bin/do_snapshot /usr/local/bin/do_snapshot
6. Now take the Droplet ID of the server which you need to take Backup. To get Droplet Id, Open the droplet link and take only numeric digits
https://cloud.digitalocean.com/droplets/9240401
In my case droplet ID is: 9240401
7. First we will try whether the script works or not by executing below command.

do_snapshot --digital-ocean-access-token e8470cf64355cdc1fc29700003aa9c6bc5 --only 9240401 -k 3 -c -v
Make sure you replace my digital ocean access token and droplet ID with your’s.
If everything works fine, then this script should take snapshot of the droplet ID which you provided in the command.
Let’s Automate Taking Snapshot using Cron Job
Once command successfully started working manually, now we will schedule cron job to do work for us. Before setting cronjob we need to run two more commands. Execute below commands one by one.
gem install rest-client
rvm cron setup
once you done that. Open crontab by executing below command.
crontab -e
scroll down to the bottom of the page and and place the below command on it.
40 13 * * * do_snapshot --digital-ocean-access-token e8470cf64355cdc1fc29700003aa9c6bc5 --only 9240401 -k 3 -c -v

Press Ctrl+X to save and exit.
Explanation of the above command.
40 13 * * * –> Every day at 13th Hour, 40 Minute command is going to execute
e8470cf64355cdc1fc29700003aa9c6bc5 –> Your digital ocean personal access token
9240401 –> Digital Ocean Droplet ID which you need to take snapshot
-k 3 –> Keeps latest 3 Snapshot and deletes more than 3 snapshot
10. That’s it. From now onwards you server will keep taking automated snapshot as per your scheduled timings.
DoSnapshot offers little more options, feel free to experiment with those options if you really want extra options.
If you have any doubts in this post, then feel free to post in comments. I will try to help.
Video Guide:
Resources: Digital Ocean | DoSnapshot | Digital Ocean Project Page | longren Guide
Give us a try https://backupsheep.com/ with free plan you can create schedule for your DigitalOcean server or volume. So instead of random weekly backup you can setup daily snapshots. You don’t even need your DigitalOcean backups enabled and you can restore snapshots from your DigitalOcean account anytime you want.
hey arun can you plzz provide a code in ruby that start and stop droplets in digitalocean
Sorry. I’m not aware of ruby.
Hi Arun, really nice tut. In this tut u mostly talked about the latter one of these two: Server-to-Backup: This is the server to take automated snapshot on scheduled timing.
Automation-Script-Server: This is the Server to which runs digital ocean automated snapshot script (DoSnapshot).
I mean you mostly explained about sever one which script run. I did all this and found very very useful, I had one doubt – Can you please explain about server to backup – is this digitalocean server or can this be external server on which I save my snapshots? sorry for stupid question – new to D.O. Thank you and look forward for the reply.
Server-to-Backup is a digital ocean server of course. If you understand how digital ocean snapshot works then you will understand this guide.
Can you use this to backup volume as well, and how do you find the volume id to backup?
I haven’t tried so I cannot answer that. I guess it won’t.
Hey guys,
I was interested in this question too and this is what lead me to this comment question.
I run a backup service called https://snapshooter.io where we do DigitalOcean backups for droplets and volumes.
Sometimes we get people comparing us to DoSnapshot, however we have started to get customers due to that volume support and the fact it currently does not support it. There is an open ticket here for it (https://github.com/merqlove/do_snapshot/issues/22) but that’s had no movement in over 18 months as the project looks dead and unsupported with no comments in the last 2 years :/
Simon